The Best Brown Bread

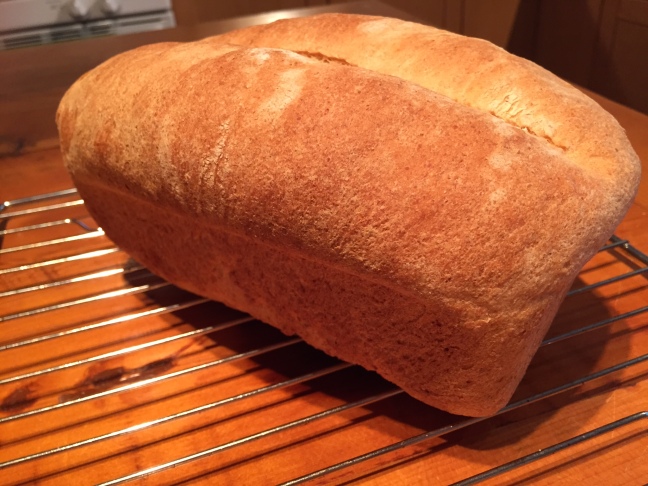
Golden brown bread.

Golden brown bread, cooling down on the counter.

Baking bread has become a bi-weekly adventure in our home, and I have not eaten store bought bread in months. It is very neat to have a loaf on the kitchen counter and a few others waiting in the freezer for perfect slices of toast or peanut butter sandwiches whenever you like.

If you have a stand mixer and an afternoon, you have the tools and the time to produce a perfect batch of bread that will keep you and yours happy for weeks. I suppose an oven and bread pans are also essential, but the ingredients that go into bread are so simple, it’s easy to have everything on hand.

I’ve gone through a few recipes in the last few months. It is hard to find a brown bread recipe that isn’t dense, or dry, or crumbly (or all 3). I landed on this recipe in January and have now made it 3 times with recurring success. It will either make 2 giant loaves (9×5 pans) or 3 moderate loaves (4.5×8.5 pans). The loaf stays soft, which is great for sandwiches, and has a lovely nutty-honey quality from the whole wheat flour and honey. I find a 2:5 ratio of white flour to whole wheat gives enough structure as well as nutrition. Pure whole wheat bread is hard to keep edible as a home cook, so a few cups of white flour will stick everything together and avoid a cardboard bread situation.

This recipe is pretty great. I reverse the flour, though- 5 cups of whole wheat to start, then add in 2-3 cups of white flour to round things out. Knead it in the mixer 3-5 min, then a little while on a floured counter. You want the dough to be elastic but sticky at the end, that will give you nice texture and moisture in your finished loaf. My oven is about 30 minutes on the dot for 3 golden brown loaves. If you go the 2 giant loaves route, it is more like 35 minutes. I don’t do the final brush of butter- I don’t find the bread gets hard after it cools but if you live somewhere very dry that might be helpful.

Happy baking and sandwich making!
The Year of Bread

Honey oat bread fresh from the oven.

Honey oat bread fresh from the oven.

This new year is shaping up to be the year of bread. Homemade, that is. For the past few months I have been experimenting with baking fresh bread. It is really hard to find a decent loaf at the grocery store that has some whole grains but is also actually edible, not dried out, or mouldy in 4 days.

So I’ve been trying out loaves of whole wheat, also made some baguettes and then landed on this honey oat bread recipe. As a home baker, I have been finding 100% whole wheat recipes hard to produce (and hard on my KitchenAid mixer- had a little incident with some smoke one day!), so I’ve been trying out recipes that mix some whole grains with white flour to keep from being too dense and hard to knead.

This Rustic Honey Oatmeal Bread recipe from Robin Hood flour fit the bill. I really like the taste of honey in bread, and this one also had a decent amount of oats (2 cups oats to 4 cups flour). I modified the recipe to only use honey as the sweetener and just used 4 cups flour as my dough came together at that amount. You end up with 2 decent sized round loaves, which are better for toast than sandwiches. It could probably be baked in small bread pans if you want it sandwich sized. Nice crust, dense interior- not a lofty loaf but a nice crunchy piece of toast.

I have some new bread pans on order as well as a baguette pan, so will report back on further bread baking adventures.

Better than a Bakery Cinnamon Buns

PHOTO_crop

Fresh from the oven and waiting for some glaze.

I like to mark a new year by posting the most un-diet thing possible. Last year’s new year post featured a mind-blowing chocolate cake. This year I would like to share a new baking adventure that created the most lovely cinnamon buns that have passed my lips. These yeast-dough buns are fluffy-yet-dense, lightly sweet so as not to compete with the cinnamon and sugar, and bake up into monster buns that you think you won’t finish but you absolutely will.

I have certainly indulged in Cinnabon buns, bakery buns, been served cheater “Land of Nod” buns that I find too sweet with no spiral fun, but I have never made them myself. I can’t believe it took me so long! These will be a brunch staple for sure, the shear impressiveness of a pan of these right out of the oven begs for an audience.

I used Michael Smith’s Cinnamon Rolls recipe and followed it exactly. I wouldn’t change a thing, either. The glaze to finish (not pictured) is the final touch- it’s not too sweet and gives just the right finish. My KitchenAid mixer was a big help with this one, although you don’t need to mix with the dough hook for too long. The dough comes together fairly fast and is a pleasure to knead into a smooth, elastic ball. It rose quickly (hint: I put it in my warm utility closet to speed the rise time) and rolled out like a dream. Almost like play-doh for adults. And it tastes better. I think you could make the dough the night before, let it rise and then store in the fridge to be ready for the morning, since it does take a couple hours from scratch.

Cutting the roll for baking.

Cutting the roll for baking.

Best kneading ever.

Best kneading ever.

And if you’re intimidated by yeast, kneading, rising time, etc., etc., don’t be! I have no real dough experience beyond pizza dough, and this was a dream. You’ll feel so accomplished after baking these, like Laura Ingalls Wilder would be impressed, I dare you to make them- and then tell me about it- or invite me for brunch.

Happy Thanksgiving!

20131012-151035.jpg

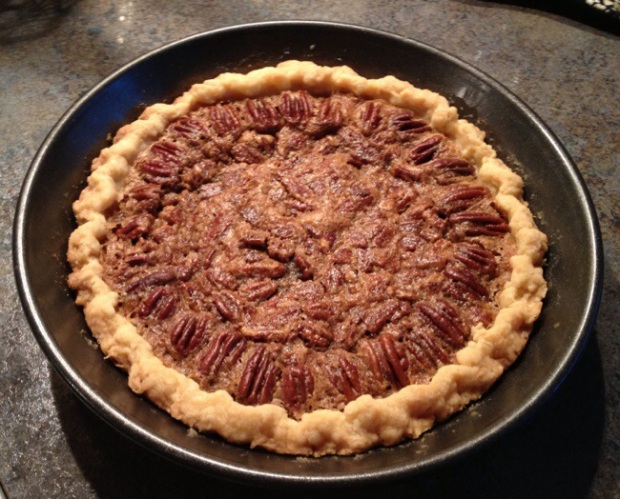
It is a beautiful fall weekend in southern Ontario, perfect for a Thanksgiving holiday. Before I could go outside to enjoy it, I baked up this beauty, a Pecan Pie for tomorrow’s family feast.
Happy feasting everyone! I hope a slice of your favourite pie makes it to your plate this weekend.

Ontario Peach Pie

IMG_0015The year has been passing by at light speed, taken up with work, a few vacations, and all the little things that use up a day. I’ve gotten quite a few questions lately about my blog. Why haven’t I posted much this year? What am I drinking? The truth is probably two-fold- I’ve amassed quite a portfolio of favourite wines and recipes and don’t always have new food and drink to share, and having a computer-heavy day job can be a drain on the creative juices.

But if there’s anything that might get a cook’s energy back up, it is late summer and early fall in Ontario. Having grown up a prairie girl, I am amazed every year here when the bounty begins to roll in. Niagara peaches are one of my very favourite treats, but they tend to come in huge baskets and ripen all at once. Every August at this time I search for a random peach pie recipe, and then think, why haven’t I posted this so I’ll know what to make next year?

IMG_0017This year I found two good recipes: One for the #1 Best Pie Crust Ever and the other for Mama Thornton’s Peach Pie, both from the Food Network. The pie crust uses butter and shortening and has definitely replaced my old standard Crisco recipe. The butter makes the dough less crumbly and easier to work with, and browns up so beautifully I could hardly wait for the pie to cool before slicing through the crisp crust into the peaches below. The peach filling is fantastic- gooey but not runny and just the right amount of sweet. The only change I made was to double the lemon juice and add a splash of vanilla extract.

So, if you have peaches ripening en masse at this very moment- I hope a peach pie is in your future.

Best of Baking

IMG_0803The holiday break has afforded many opportunities to rev up the new Kitchenaid mixer. I look at it daily and think “what can we make today?” And then I tell my mixer that treats cannot be an everyday occurrence. Although they should be.

For a New Year’s get together I jumped on the chance to bring dessert so that I would have an excuse to make a chocolate cake. I made my favourite Nigella version, posted here. It was more-ish as always and was promptly demolished, as chocolate cakes should be. You should make it. And fill your face with it-but don’t blame me for your derailed resolutions. Blame Nigella.IMG_0793

If you want something a little lighter and less guilt-inducing, I made holiday gingerbread in December and didn’t get around to posting it. I shared the cookies around at a few holiday shindigs and people are still talking to me about it. It’s just a McCormick recipe, but I think the magic is in the technique. Roll the dough as thin as you can and bake them until firm, and you’ll end up with light, crispy, refreshing ginger bombs. They are so good and so delightfully spiced that I am thinking about making another batch just to have for after-dinner treats. They keep really well in the freezer, just waiting for when you need a ginger pick-me-up. You can also tell yourself that ginger is good for digestion and therefore this cookie is good for you. Plus they have molasses and that’s better than white sugar, right?Blueberry Muffins

So finally, in a moment of holiday boredom, I whipped up some blueberry muffins to pass the time. I used my favourite recipe from Smitten Kitchen (see my previous post here) and they were perfect to have on hand for post-Christmas snacking and lounging about.

So here are 3 ideas for homemade treats to start 2013 with a bang and give the finger to any thoughts of healthier living and self-denial. Plus, some self-righteous food guy once said (something to the effect of) “it’s ok to eat treats as long as you make them yourself.” And that’s the mantra I live by. Although it’s also ok in my books if Pan Chancho or Bread & Butter Bakery make them too.

Holiday Baking Round 2

IMG_0791This weekend, I spent an afternoon in the kitchen, adding 3 new treats to the baking stockpile. My Kitchenaid mixer got another workout, this time with Whipped Shortbread (dipped in chocolate), and I followed that up with 2 simple but delicious no-bake cookies: Chocolate Haystacks and Butterscotch Confetti squares.

The shortbread and squares are both classics, throwbacks from childhood, just as delightful and addictive as ever. Just today I shared the Butterscotch Confetti with a friend and we discussed what vintage gold they are. As a rule, I’m not a huge square fan as sometimes they are best left in the 1980s, but these are just the right mix of peanut butter and butterscotch, and if you eat them super cold, the texture of the marshmallows is irresistible.

And the beauty of these 3 treats is that they each have so few ingredients, chances are you have them already in your pantry.

Whipped Shortbread
(From Best of Bridge)

Ingredients
1 cup butter, softened
1 1/2 cups flour
1/2 cup icing sugar
3 squares of semi-sweet baking chocolate

Directions
1. Preheat oven to 325F.
2. Whip the first 3 ingredients together in a stand mixer for 10 minutes, until very smooth and fluffy.
3. Drop by the teaspoon onto a parchment lined cookie sheet and bake for 13 minutes at 325F.
4. Cool the cookies while melting the chocolate. Dip the cookies half in the chocolate and cool in the fridge.

Butterscotch Confetti
(From Company’s Coming)

Ingredients
1/4 cup butter
1/2 cup smooth peanut butter
1 cup butterscotch chips
1 bag mini marshmallows

Directions
1. Melt the first 3 ingredients together in a saucepan or the microwave.
2. Stir in the marshmallows and pat into a 9×9 pan.
3. Refrigerate until firm. Cut into squares. These freeze well for later use.

Chocolate Haystacks

Ingredients
1/2 cup butter
1 1/4 cups white sugar
1/2 cup milk
6 tbsps cocoa powder
1 tsp vanilla
1 cup flaked coconut
3 cups quick oats

Directions
1. Boil the first 4 ingredients together in a saucepan for 3 minutes, stirring constantly.
2. Stir in the final 3 ingredients quickly.
3. Drop by the teaspoon onto a cookie sheet and refrigerate until firm. These freeze well for later use.

And finally….Kevin is asking for gingerbread…so perhaps we’ll have adventure #3 in Christmas baking someday soon.

The holidays are here…

December is upon us and I find myself in the mood to stockpile delicious baked treats in my freezer. It may have something to do with my new friend. We met last weekend in America, while doing some browsing of the holiday sales, I came upon a Kitchenaid mixer in need of a good home. This amazing piece of kitchen equipment had never really been on my radar because of the steep pricetag, but I found a deal too good to pass up, and now I have a glossy black Kitchenaid Professional 5 Plus standmixer staring me in the face every time I walk into the kitchen.

I used it earlier this week to whip cream in record time, but have been thinking all week about holiday cookies. I decided to make a favourite, Bird’s Nests with Raspberry Jam, these are always such a nice mix of crispy cookie and sweet-tart jam (pictured in the foreground). Those didn’t seem enough, so I let Kevin pick from Chatelaine’s holiday cookie list, and he wanted Birthday Cake Icebox Cookies (pictured on the left). To be honest, I laughed and assumed they would not be great, but I have to say they are quite tasty. It’s basically a sugar cookie with a bit of crunch from the sprinkles and an extra sweet kick from the icing sugar glaze- a vanilla sugar bomb of a cookie.

To round out the weekend I decided to make some buttertarts. These didn’t need the help of the mixer, but I’ve been missing these in my holiday life for years. There are so many buttertart variations out there, pecan, walnut, raisin, no raisin, corn syrup-based, maple syrup-based, egg-based, etc., etc. All I really want is the kind my mom made when I was a kid: egg-based, with raisins and pecans. The recipe comes from a well-worn Best of Bridge cookbook and is simply buttertart perfection (pictured on the right).

The Best Buttertarts

Makes 12 buttertarts.

Ingredients

  • 1 cup white sugar
  • 2 eggs
  • 1/3 cup butter
  • 4 tbsp. cream
  • 1 tsp. vanilla
  • 1 cup seedless raisins
  • 1/2 cup chopped pecans
  • 12 tart shells (recipe for 1 pie crust will be enough)

Directions

1. Preheat oven to 375F.

2. Beat eggs in a saucepan, then combine the next 5 ingredients in the saucepan. Boil on medium heat, stirring constantly, for 3 minutes.

3. Sprinkle a few pecan pieces in the bottom of each tart shell, then spoon 1/4 cup of tart filling into each shell.

4. Bake for 15 minutes at 375F. The tarts will be done when the filling is set and the crust is flaky and golden.

Pastry tip: Make 1 pie crust using the Crisco recipe (3/8 cup shortening, 1 cup flour, 1/2 tsp. salt and 4 tbsp. cold water), shape into a ball and chill 30 minutes. Roll out to 1/4″ thickness, cut into 12 circles with a cookie cutter or water glass, and shape into a 12-muffin tin. Chill the tart shells another 30 minutes, then fill with hot filling and bake immediately. The cold crust will turn out extra puffy and flaky.

So, holiday treats to come…perhaps some Butterscotch Confetti, Chocolate Haystacks, Whipped Shortbreads? Stay tuned.

Sunday Night Soup

I looked in the fridge tonight, which is a bit bare at the moment, and saw some lovely local corn that needed a home. A glance in the veggie drawer revealed the makings of soup, which may be a bit much on a hot day, but a nice clear broth with fresh summer veggies seemed right.

I sauteed the onions, celery and carrots in a bit of olive oil, added in 2 handfuls of red lentils for a bit of protein, and got them glossy in the oil. In went 6 cups of water and a healthy sprinkle (1-2 tsp.) of Vegeta (the MSG free kind); chicken or vegetable stock would work too. After about 10 minutes, the veggies and lentils had soften up and I added the corn (cut off the cobs), some canned diced tomatoes and a sprinkle of parsley. That simmered for about 10 minutes, and combined into a wonderfully simple pot of summer flavours. Two bowlfuls for dinner were just the ticket.

Simple Summer Fun: Lemon-Limeade Concentrate

For the first time in my life, I have a Costco membership. I’ve always resisted, having no storage space and only 2 people to buy groceries for. But due to some tire problems on a roadtrip, and Costco saving the day, I found myself back at home for another long hot month of summer with a membership card burning a hole in my pocket.

Last night, on our inaugural grocery shop, I came across a mammoth bag of lemons and limes. They were just so pretty and happy, all jumbled up in their bag. Sunny yellow and tropical green, singing a siren song about homemade lemon-limeade. And I couldn’t resist, even though there were about 20 fruit in the bag (which is kind of an insane number when you have no firm citrus plans). But it was a good impulse buy, as I recently acquired an amazing citrus press from Crate & Barrel (an impulse buy on my roadtrip). So all this following-of-citrus-gut-instincts came to fruition (literally) in my kitchen this evening.

About 20 minutes of squeezing and squashing 5 lemons and 5 limes yielded 1.5 cups of lemon-lime juice. Mix this with 3.5 cups simple syrup (2 parts water, 1.5 parts white sugar, heated to boiling and then cooled), and you’ll have a mason jar full of concentrate, just ready for mixing with still or sparkling water any time you fancy a refreshing summer drink.

I mixed around 1 part of the concentrate with 2 parts water, threw in a handful of ice, and the drink had the perfect sweet-tart ratio you expect, with a hint of lime with the lemoniness. I declare this citrus indulgence a firm success.